American Breakthrough Attack, NW Europe, Summer 1944
This first report details a fictional American breakthrough attack against a German-held position in a ruined French village. The objective for the Americans is to exit 25% of their units across the opposite table edge to earn a minor victory and at least 50% to earn a major victory. The objective for the Germans is to inflict 25% casualties to earn a minor victory and break the attacking battlegroup to earn a major victory. The game lasts for 12 turns, with the Americans taking the first turn.
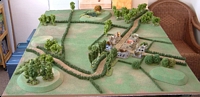
The Battlefield
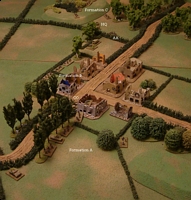
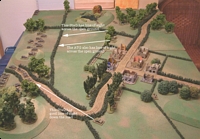
Below is a picture of the battlefield, played across the width of a table approximately 120cm by 160cm. There is quite a lot of terrain on the table from a gaming point of view, but this would be very open country in reality! At least it gives some idea of the difficulties troops faced when fighting in close-country.
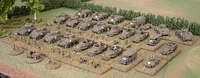
American Order of Battle
The American battlegroup comprises of the following units, split into five separate formations. Note that formations aren't fixed in BlitzkriegCommander, but you will find yourself grouping units into formations at the start of the game. This makes more sense than just sending them forward in one big mass, something that your opponent would find easy to deal with if you did!
| |
Command |
| |
|
CO (Command Value 10) |
| |
|
1 x Recce Unit (Greyhound) |
| |
|
1 x Support Unit (Mortar, M3) |
|
|
| |
Formation A |
| |
|
HQ (Command Value 8) |
| |
|
3 x Infantry Units & M3 Half Tracks |
| |
|
1 x Support Unit (MG) & Truck |
| |
|
3 x Medium Tank Units (Sherman 75) |
| |
|
1 x Medium Tank Unit (Sherman 76) |
|
|
| |
Formation B |
| |
|
HQ (Command Value 8) |
| |
|
3 x Infantry Units & M3 Half Tracks |
| |
|
1 x Support Unit (MG) & Truck |
| |
|
3 x Medium Tank Units (Sherman 75) |
| |
|
1 x Medium Tank Unit (Sherman 76) |
|
|
| |
Artillery Support |
| |
|
2 x FAO (Command Value 8) |
| |
|
3 x Artillery Units (105mm, Priest) & two assets each |
|
|
| |
Air Support |
| |
|
1 x FAC (Command Value 8) |
| |
|
1 x Ground Attack (P-47, bombs) with one asset |
This works out to 1800 points and a breakpoint of 9.
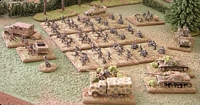
German Order of Battle
The German battlegroup comprises of the following units:
| |
Command |
| |
|
CO (Command Value 9) |
| |
|
HQ (Command Value 8) |
| |
|
1 x Support Unit (AA, Sdkfz 7/1) |
|
|
| |
Formation A |
| |
|
3 x Infantry Units |
| |
|
1 x Support Unit (MG) |
| |
|
1 x Support Unit (MM) |
| |
|
1 x Support Unit (IG, 75mm, 251/9) |
| |
|
1 x Medium Panzer Unit (StuG-III long) |
|
|
| |
Formation B |
| |
|
3 x Infantry Units |
| |
|
1 x Support Unit (MG) |
| |
|
1 x Support Unit (MM) |
| |
|
1 x Support Unit (ATG, 75mm) & Truck |
|
|
| |
Formation C |
| |
|
3 x Infantry Units |
| |
|
1 x Support Unit (MG) |
| |
|
1 x Support Unit (MM) |
| |
|
1 x Medium Panzer Unit (StuG-III long) |
|
|
| |
Artillery Support |
| |
|
1 x FAO (Command Value 7) |
| |
|
1 x Artillery Unit (RL, Nebelwerfer) |
This works out to 1000 points and a breakpoint of 10.
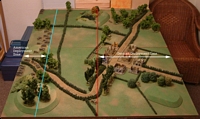
Deployment
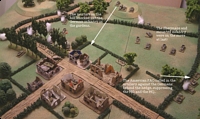
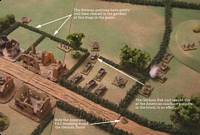
The Germans deployed first on the right of the table up to the table centre. Note that a couple of units are forward of this line - it makes sense to place a unit behind a piece of cover rather than in the open, so some flexibility is allowed here. The Americans deployed second up to 20cm from the left edge of the table. Deployment can be seen in the picture to the left.
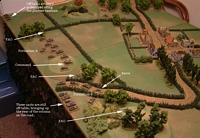
The German deployment can be seen in the picture to the left. One of the StuGs is covering the road (in the lower left of the picture), the other is near the HQ covering the open ground in the centre. The anti-tank gun is also covering the open ground as it is anticipated that the Americans will deploy along the hedgerow opposite to provide covering fire for their advance up the road. Some of the units are hidden from view in the pic: the FAO is in the building with the blue interior walls, the CO is on the road behind and to the left of that building. The StuG in the top of the pic is behind the hedge, as is the AA unit to its right.
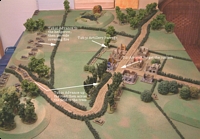
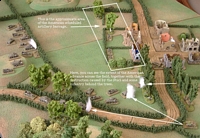
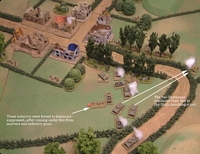
The Americans are deployed as shown in the final picture. Note that 'Formation B' is deploying up the road, but not all of the units fit on the table - those that don't fit on the road are placed along the edge of the table and will be placed on the road when the other units in the column move forward. Also note the artillery units along the edge of the table in the top left of the picture. These will remain there for the duration of the game.
American Plans
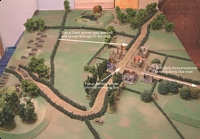
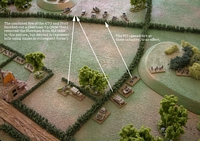
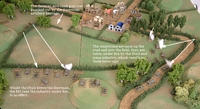
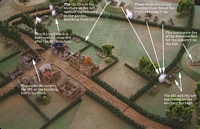
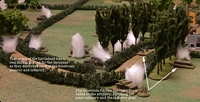
Formation A will advance the short distance to the hedgerow to their front and provide covering fire, whilst Formation B advances down the road a short distance. This will then veer left across the field to the trees where it will provide covering fire to allow Formation A to storm across the field and into the village. Both formations will finally move off down the road as indicated in the second picture and exit the table as quickly as possible.
The artillery support will lay down a barrage on the second turn, centred on the tree as indicated in the first picture. This will continue into turn three. The air support will target the road junction on the second turn. The two pictures to the right illustrate the American plans.
German Plans
Formation A is covering any advance down the road, the StuG having a perfect line-of-sight against anything travelling up the road. The other StuG and the ATG have lines-of-sight across the field in the centre and should hopefully be able to combine their fire against any units that attempt to cross. The CO will have Formations A and B under command, some of the units being further than 20cm away so the higher command value will hopefully allow the CO to issue orders to these. The HQ has Formation C under command on the German right flank.
American Turn 1
The Americans took the first turn. 'Formation A' moved up to the hedge and the troops dismounted their transport, but there were no targets for the Shermans to fire at. 'Formation B' on the road unfortunately didn't move as the HQ failed its first command roll.
German Turn 1
The German turn began with the FAO attempting to request artillery support from the Nebelwerfers - the command roll failed, so the Nebelwerfers didn't open up. The HQ on the right flank managed to issue three successive orders, however, which resulted in one Sherman 75 brewing up after taking multiple hits from the ATG and StuG! The MG also opened up but failed to do any damage. Finally, the CO failed its first command roll, indicating that the first turn was over. Still, first blood to the Germans.
Casualties
The Americans were one Sherman down, so they were 1/9* away from their breakpoint. The Germans were still 0/10 away from their breakpoint.

American Turn 2
Turn two opened with the scheduled artillery barrage from the three Priest units. This caught a considerable number of German units in its fire-zone, but due to the attacks being spread out over a large area, the artillery only managed to suppress the MG and mortar in the centre.
The FAC managed to request air support against the German anti-tank gun in the shape of the P-47s. This was successful as the ATG was destroyed, along with the truck.
The HQ commanding 'Formation A' failed its first command roll. However, the HQ from 'Formation B' succeeded this time round, allowing the tanks and half-tracks to move up the road and into the field to their left. The CO issued orders to the mortar in the M3 half-track to open fire at the German MG opposite, causing it to fall back 11cm (as it was already suppressed), knocking it out (dug-in troops are knocked-out when forced to fall-back further than 10cm).
German Turn 2
An attempt to request the Nebelwerfers failed again this turn! The HQ managed to issue one order, then failed - the StuG fired at the Sherman 76 without any lasting effect.
The CO rolled double one which meant two orders were issued instead of one, allowing the StuG on the left flank to fire at the Sherman 76 on the road, brewing it up. The StuG then went on to brew a Sherman 75 in the field as it was showing its flank - never a good idea! An infantry unit behind the hedge knocked-out the Greyhound armoured car positioned across the road - bang goes the US recce. This roll of good luck was cut short by a command blunder as the CO attempted to issue another order, signalling the end of the second turn for the Germans.
Casualties
A bad turn for the Americans as they lost two more Shermans, including one of the valuable 76mm versions. This brought their casualties up to 3/9. The Germans were now 1/10 away from their breakpoint.
American Turn 3
The scheduled artillery barrage continued this turn, suppressing the MG and HQ on the German right flank. The scheduled air strike also took place, with the P47s concentrating their attacks against the MG in the house near the road junction. Unfortunately this had no noticeable effect.
The HQ commanding 'Formation A' on the American left flank issued orders that resulted in the Shermans concentrating their fire at the StuG behind the hedgerow to their left, brewing it up!
The HQ on the right flank wasn't so lucky, rolling a blunder. The resulting cross-fire brewed an M3 half-track and its passengers nearby - it was one of those days! Finally, the CO issued orders to the mortar on the hill to target the German infantry to their front, knocking them out.
German Turn 3
On his third attempt in as many turns, the FAO succeeded in requesting artillery support from the Nebelwerfers. These targeted the formation behind the hedge, but their aim wasn't good - landing forward and to the right, the rockets caught the German infantry on the hill. Fortunately they survived as they were dug-in!
The HQ was suppressed by the artillery barrage so could issue no orders this turn, which left the CO. The turn ends for the Germans as the CO failed to issue any orders - it was going to be one of those days for the Germans too by the look of things...
Casualties
Casualties were mounting on both sides at the end of turn 3. The Americans had now lost five units, meaning they were 5/9 away from their breakpoint. The Germans were 4/10 away from theirs, so they were taking the attack in their stride, although they could ill afford the loss of the ATG and one of the StuGs.
American Turn 4
The fourth turn began with the FAO on the American left flank calling in the three Priests against the MG position behind the hedgerow. This managed to suppress the MG and the German HQ, which was a good result.
Bad luck hit when the HQ commanding 'Formation A' failed its first command roll. This wasn't too bad though, as the main targets in that sector had already been knocked-out. The HQ commanding 'Formation B' on the right flank had more success, with two Sherman 75s taking on the StuG and knocking it out!
Finally, the CO issued orders to the mortar on the hill to target the MG, to no effect.
German Turn 4
The Nebelwerfers were called in again this turn, this time targeting the troops in the field near the road. Unfortunately, the gunners missed by a fair distance, catching some of the German troops in the village! Even the FAO that requested the artillery was caught in the blast, but fortunately casualties were light: the German MG in the house and the infantry in the gardens were suppressed. The American machine gunners riding in their soft transport were knocked-out.
The HQ was suppressed by the American artillery, so couldn't issue any orders this turn. The CO in the village ordered two mortar units and the infantry gun unit to open fire at the Americans in the field, forcing some infantry to dismount their transport.
Casualties
The Americans were now 6/9 away from their breakpoint, the Germans 5/10. The battle was a struggle for both sides, with the Germans gaining the upper hand slightly.
American Turn 5
The Priests managed to get the same result again this turn, suppressing the MG and HQ on the left flank. This would definitely assist the troops in crossing the open ground, as long as they could get their act together of course!
Sure enough, the HQ commanding 'Formation A' took immediate action, getting the infantry to mount-up and the Shermans opened fire. Then off they roared, breaking through the hedgerow and out into the open field - racing for the gap a few hundred metres away! As they were doing this, the machine gunners who were providing covering fire also mounted-up, in preparation to move out.
Whilst this was going on, the HQ on the American right got the two Shermans to move forward. The CO ordered the mortars to fire at the German infantry in the gardens, knocking them out.
German Turn 5
The FAO began the fifth German turn with a bang, rolling double one! The Nebelwerfers released a salvo against the Americans that had broken out into the field, unfortunately to no effect as the infantry were pretty safe in their armoured transport and artillery doesn't have much effect against tanks.
As the HQ was again suppressed, all that was left was the CO, who had a very successful time over on the German left flank. The mortars and infantry guns opened up on the American infantry in the field opposite, at first suppressing them, then finally knocking them out. The three infantry units behind the trees stormed across the road and knocked-out both Shermans using their Panzershrecks. Finally, the infantry knocked-out one of the M3 half-tracks!
Casualties
Things were now looking serious for the Americans as they had lost nine units and their breakpoint was nine! The Germans were 6/10 away from theirs.
American Turn 6
The Americans had reached their breakpoint as they had suffered 50% casualties. This meant that at the start of every American turn, the American player must make a command roll using the command value of the CO, deducting one for each casualty over 50%. As the Americans had lost nine units out of nine, it was just a straight roll against a command value of 10. The American player scored 2+6, so the American troops fought on!
The FAO that had moved round the right flank succeeded in requesting the Priests this turn. They targeted the German infantry on the road and managed to knock-out one infantry unit, suppress another, and even knocked-out the infantry gun behind the trees!
The FAC had meanwhile moved into one of the houses by the junction and called in air support against the mortars in one of the other houses. This had no effect, however.
Moving across to the HQ on the left flank, three orders were issued in succession allowing the Shermans and half-tracks to move across the open ground, through the gap and into the smaller field on the edge of the village. There wasn't much for the other HQ to do, however, as most of his units had been knocked-out! This left the CO to wrap up the turn, who managed to call in the mortars several times, suppressing the German infantry in the gardens and the MG behind the hedge on the left.
German Turn 6
The first initiative action of the game occurred when the German flak unit opened-up against the American truck-borne machine gunners in the small field. The FAO then went on to roll a blunder, resulting in the Nebelwerfers taking counter-battery fire and becoming suppressed! That'll teach 'em!
The HQ failed his first command roll - obviously still getting over the suppressions of the last couple of turns. The CO in the village got the infantry and mortars into action once again, who knocked-out the remaining American infantry in the corner of the field. This looked like a real killing ground, with wrecked vehicles all over the place...
Casualties
The casualties were still mounting, with the Americans having lost ten units, the Germans eight. The American player would struggle to keep his troops on the battlefield next turn.
American Turn 7
As the Americans had lost ten units and had a breakpoint of nine, the CO had to pass a command roll to ensure his troops fought on, otherwise they would break from the battlefield. The command value of the CO is 10, but one was deducted as the Americans having lost one unit more than their breakpoint, so the player needed 9 or less. Rolling two dice, he scored 5+6: fail! The American troops withdrew from the battlefield and the game was over.
Victory Conditions
The Americans failed to obtain their objectives, as they didn't exit any units off the table. The Germans managed to obtain their major objective, which was to break the American battlegroup. After taking a look at page 35 of the rule book, the result was a Decisive Victory for the Germans!