Operation Compass: Italian Counter-Attack
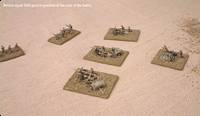
The second battle in the campaign sees the Italians launching a counter-attack against the British south of Side Barrani. The Italian player decided to use 1500 points for the battle (the player with the campaign initiative decides how big the battle should be), but as this is a counter-attack scenario, the British player can only field 1000 points. Note that both totals are subject to the random points modifier.
Italian Battlegroup
The Italians deployed the following in the attack against the British:
- CO
- Bersaglieri Battalion (less the Recce and AA platoons)
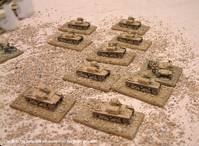
- Light Tank Battalion (9 x L3/35)
- Medium Tank Battalion (9 x M-11/39)
- Medium Tank Battalion (understrength, 6 x M-13/40)
- FAO
- Light Artillery Battalion
- Medium Artillery Battalion
British Battlegroup
The British deployed the following:
- CO
- Infantry Tank Squadron
- 1st Battalion, 16th Infantry Brigade
- FAO
- Field Artillery Regiment (on-table)
- Medium Artillery Regiment
Deployment
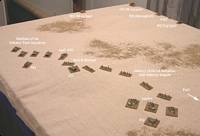
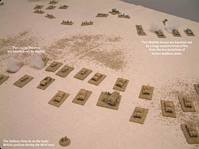
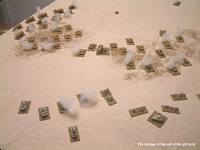
The Italians deployed their command units first, followed by the British deploying all their units (and choosing to deploy the 25pdrs on-table). As this was a hasty defence, all British infantry and guns were dug-in and hit on 5+. The Italians concentrated their deployment on the right flank of the battlefield and deployed the M-11/39 battalion on the flank as can be seen in the picture below left:
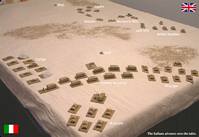
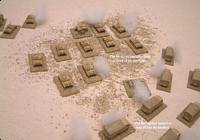
All Italian formations arrived on the table during the first turn, with the M-11/39 battalion arriving in the nearest sector on the right flank.
Due to the long range between the two battlegroups, the only thing the British player could do was try to request artillery support. This arrived in the shape of the two 6 inch batteries, hitting the light tank battalion and knocking-out two of the puny L-3/35 platoons*. That was all for turn 1.
Casualties
The Italians were 2/18 away from their breakpoint, the British 0/7 away from theirs.
* After reading an account of a British artilleryman in the desert recently (as part of a medium artillery troop), tanks were actually knocked-out by indirect fire on quite a few occasions, so for this game, we allowed fully-armoured vehicles to take hits as normal from artillery and mortars, but they were hit on sixes in all situations.
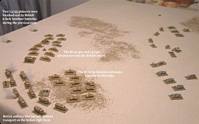
The Italians advanced again, with the M-11/39s reaching the rough ground infront of the Matildas. Italian artillery in the shape of the 75mm battalion hit the British on the high ground, suppressing an infantry platoon and a mortar platoon.
British artillery, true to form, hit the advancing column of trucks over on the far right, knocking out four trucks and their occupants (three infantry platoons and the ATG platoon).
Casualties
The Italians were now 6/18 away from their breakpoint, the British still 0/7 away from theirs.
Turn three saw the combined fire of the foremost M-11/39s soften-up two of the Matilda troops, who were then finished off by the M-13/40s. One 25pdr battery and one infantry platoon was suppressed by more Italian artillery fire.
British medium artillery hit the far right again, knocking-out two M-11/39s and suppressing four infantry platoons and two HQs! On the other flank, the 25pdrs took the Italian light tanks under direct fire, knocking two platoons out and suppressing a third.
Casualties
The Italians were now 10/18 away from their breakpoint, the British 2/7 away from theirs.
With the Italian attack on the right flank stopped dead in its tracks by artillery, it was left to the centre and the left flank to attack the British this turn. The light tanks advanced, with one platoon being knocked-out by opportunity fire from the 2pdr ATG platoon. They did, however, manage to suppress some infantry to their front. The M-13/40s fired from their forward company, whilst the following company moved forward. The British infantry retaliated by knocking-out an L3 platoon. There was no artillery support from either side this turn.
Casualties
The Italians were now 12/18 away from their breakpoint, the British still 2/7 away from theirs.
The M-13/40s continued the advance, with one company firing at the 2pdr platoon, suppressing it, the other company moving forward.
The British artillery hit the right flank yet again, knocking-out one M-11/39 platoon, an infantry platoon and three trucks. The two Matilda troops knocked-out an M-13/40 platoon. The infantry with their anti-tank rifles knock-out two of the L3 platoons, with the help of the mortars on the high ground.
Casualties
The Italians were now 17/18 away from their breakpoint, the British still 2/7 away from theirs.
Italian artillery support from the 105mm battalion hit the 25pdrs, knocking-out one battery and suppressing the HQ in the vicinity. The remaining M-11/39s knocked-out another Matilda troop and suppressed the final one. The M-13/40s suppressed the 2pdr ATG platoon.
The British 6 inch howitzers knocked-out another infantry platoon, an MG platoon and another truck, whilst a HQ and two M-11/39 platoons were suppressed. The MGs and mortars in the centre opened-fire at the leading M-13/40s, but were taken under a hail of opportunity fire and were themselves suppressed.
Casualties
The Italians had now lost 19 units, so were 1 unit over their breakpoint, the British 3/7 away from theirs. Would the Italian commander be able to hold the attack together after taking so many casualties?
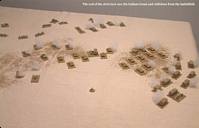
The Italian CO needed to roll seven or less on two d6 to keep his troops in-action... and failed! The battle was over as the Italians realised they had been out-fought (for the most part by the British artillery) and withdrew from the battlefield. The British had managed to hold the Italian counter-attack and thus re-gain the initiative in the campaign.
The victory conditions for this scenario was slightly different to the counter-attack in the rule book. Essentially, it was an encounter battle with one side deployed on-table at the start of the game. Either side had to inflict 25% casualties to gain a minor victory and break the opposing battlegroup to gain a major victory.
The British managed to break the Italian battlegroup, so achieved a major victory. However, the Italians managed to knock-out four out of a total of fourteen units, which was at least 25%, so they achieved a minor victory. After calculating victory points, the Italians were awarded 130 (add the points for the three Matilda troops and the 25pdr troop, then deduct 100 for the random points modifier applied to the British at the start of the game). The British were awarded 230 VPs. This was not enough of a difference between the two sides to alter the victories of either, so the British won a Minor Victory - well done, chaps!