Iraqi Invasion of Iran, 1980
by Paul Martin, December 2006
Introduction
I chose a straightforward Breakthrough Scenario, pitching 3000+ points of Iraqis in attack coming up against just over 1500 points of Iranians in defence. As a keen BKC player, I was keen to try out as many of the new rules incorporated into CWC, such as Air Support, Chemical Attacks, Reserve Pool Forces and Fortifications - so chose forces which would allow these rules to be tested out. I purposely omitted the Aircraft battle-group maximum restrictions.
Iranian Border Defence Group
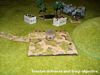
I gave the Iranian force two marked minefields, two light bunkers and one section of wire. The minefields were placed to protect each of the vulnerable flanks between the two key areas of high ground and the table edges. The 2 light bunkers were placed centrally, shoring up the gap in the hills, both with good fields of fire. Each bunker contained their maximum allowance of two infantry stands. The wire section connected the bunkers, finishing off the Iranians' central defence. The Iranians were split into three commands and a small reserve pool as follows:
| |
CO |
| |
|
2 x Regular Infantry Units |
| |
|
1 x Air Defence Unit (SAM, SA7) |
| |
|
2 x Artillery Units (105 - 122mm) with one asset each |
| |
HQ 'A' |
| |
|
4 x Regular Infantry Units |
| |
|
2 x Infantry Upgrades (RPG-7) |
| |
|
1 x Support Unit (HMG) |
| |
|
1 x Support Unit (ATGW SS10) |
| |
|
1 x Support Unit (Mortar, 81mm) |
| |
|
1 x Tank Unit (M60A1 Patton) |
| |
HQ 'B' |
| |
|
3 x Regular Infantry Units |
| |
|
1 x Infantry Upgrade (RPG-7) |
| |
|
1 x Support Unit (Mortar, 81mm) |
| |
|
1 x Tank Unit (M60A1 Patton) |
| |
Reserves |
| |
|
1 x Regular Infantry Unit |
| |
|
1 x Infantry Upgrade (RPG-7) |
| |
|
1 x Support Unit (HMG) |
| |
|
1 x Support Unit (ATGW SS10) |
The COs' command was placed in and around the town, and within a short distance of each infantry command to enable him to assist either command with his slightly higher CV. The two artillery pieces were placed in a direct fire role in the centre of the entrenchments on the large hill.
HQ 'A' commanded the expanses of the valley floor from their entrenched positions on the larger of the two hills on the left flank with a small detachment in the left hand bunker.
HQ 'B' covered the exposed right flank of the Iranian positions on the smaller of the two hills, with the M60A1 supporting the small detachment in the right hand bunker.
The Iranian Battle Plan
The battle was set to start at night. This would mean that all three commands would be at a -1 CV disadvantage throughout the battle. A significant mistake made in the fixed formations (mixing Infantry and Armour in the same command) meant that both the main commands would be fighting at a further -1 CV modifier – reducing their CVs respectively to 5!
The Iranian player could expect to get very few successful CV rolls so would need to depend heavily on opportunity fire and/or initiative actions. By placing the CO relatively centrally, who would start on a CV of 6 (-1 CV for night fighting plus a -1 CV for issuing orders to another HQ), at least stood a 50/50 chance of squeezing in at least one order each turn. The insistence of the Iraqis to attack at night would also mean that they had to close to well within the night visibility distance meaning that opportunity fire and initiative firing would be a distinct possibility.
Other than that, the plan was straightforward – if it moves (or fires), shoot it!
Iraqi Assault Group
The Iraqi battle-group was a far simpler task – lots of infantry, a large armoured thrust and a fair amount of aircraft support (which isn’t strictly allowed in the rules – but being a megalomaniac I chose to ignore!).
Commandos are a must in any Iraqi Army. Given Regular and Militia troops natural reluctance to engage with anything unless it’s suppressed, a small detachment would be placed under the CO along with the only IFVs available – BMP-1s to give them even more punch. A large reserve pool would also give the Iraqis a significant advantage in deploying troops to a command wherever a breakthrough was imminent or to exploit any collapse in the Iranian lines.
The Iraqi assault group was split into 6 formations as follows:
| |
CO |
| |
|
4 x Commando Infantry Units |
| |
|
4 x Infantry Upgrades (RPG-7) |
| |
|
4 x IFV Units (BMP-1) |
| |
Armoured HQ |
| |
|
2 x Tank Units (AMX-30) |
| |
|
3 x Tank Units (T-54/55) |
| |
|
3 x Tank Units (T-62) |
| |
|
1 x Air Defence Unit (AA, ZSU-23-4) |
| |
Infantry HQ |
| |
|
1 x FAO |
| |
|
1 x Recce Unit (AML-H90) |
| |
|
6 x Regular Infantry Units |
| |
|
1 x Support Unit (Mortar, 82mm) |
| |
|
3 x Artillery Units (105 - 122mm) with two assets each |
| |
|
3 x Transport Units (BTR-152) |
| |
Infantry HQ, Flank Attack |
| |
|
6 x Regular Infantry Units |
| |
|
1 x Support Unit (Mortar, 82mm) |
| |
|
3 x Transport Units (BTR-152) |
| |
Air Support |
| |
|
2 x Aircraft Units (SU-7 Fitter) |
| |
|
2 x Aircraft Chemical Weapons Assets |
| |
|
2 x Attack Helicopter Units (Mi-24 Hind) |
| |
|
6 x Aircraft Ground Attack Assets |
| |
Reserves |
| |
|
6 x Regular Infantry Units |
| |
|
3 x Transport Units (BTR-152) |
The COs' command was deployed between the palm tree scrub and the hill on the left flank. The Armoured command was deployed on the extreme right flank on the open plain. The Infantry command was deployed in direct support of the Armoured command. The Infantry Command Flank Attack force was held off table anticipating joining the centre sector of the battlefield in support of the Iraqi CO. The Chemical Attack Aircraft were scheduled to strike on turn one attacking both bunker positions.
The Iraqi Battle Plan
The Iraqis chose peace through superior firepower! An aerial chemical assault on turn one was scheduled to take out each of the bunkers, whilst successive turns of concentrated artillery would batter anticipated enemy positions atop the major of the two hills.
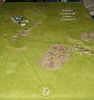
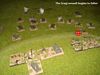
Using their key tactical advantage – an attack under the cover of darkness, their assault groups would stream towards their first objectives shown in the photograph (see below), then through onto the main objective of the town.
Attack helicopter support would be available to assist the initial attacks particularly against any enemy armour. The reserve would be held off table as long as possible to exploit any break in the Iranian lines.
Turn 1
Iraq launched its twin aircraft chemical attacks on both Iranian bunkers. Despite some hostile AA and SAM attention from the Iranian COs' command, both attacks were carried off leaving the infantry in both bunkers suppressed along with the sole supporting M60A1.
The concentrated artillery barrage of a three gun 122mm D30 battery rocked the largest of the two defended Iranian hills, but without suppressing a single unit. Maybe the barrage in the turn following would have more success?
All four Iraqi commands held their ground choosing not to close the distance. Only the solitary AML-H90 in its recce role closed the gap, probing the Iranian defences hoping to determine some of the enemy positions.
The Iranian defenders on the left most hill spotted an early mistake in their enemies deployment. The main armoured strike force and its supporting infantry (lit up by the moonlight) had all deployed within the 50cm visibility of their positions.
The combined fire of an ATGW SS10 and the emplaced M60A1 ensured that the lead T55 brewed up whilst a second T55 was suppressed. The remaining Iranian defences checked their fire.
Iraqi Breakpoint 1/25, Iranian Breakpoint 0/12
Turn 2
The second concentrated artillery barrage crashed down on the Iranian defenders of the hill and again failed to suppress a single unit. This failed effort signalled further dismay for the Iraqis - the AML-H90 recce unit failed to establish radio contact with his HQ and the main armoured assault also refused to move or open fire. The main Iraqi assault on the right now sat in open ground facing an entrenched enemy!
Only the supporting infantry HQ managed to close the distance; close enough to engage and destroy dreaded Iranian ATGW with the combined fire of the supporting 82mm Mortar and all three BTR-152' MGs. The infantry dismounted in preparation for an assault on the hill, but their next command roll failed miserably leaving them very exposed at the foot of the hill.
On the right the Iraqi COs' command advanced on the second hill to within visibility of the Iranian positions – but then failed his next command roll. Even the air assaults by two Hind-Ds failed to KO (or suppress) the supporting M60A1. Thankfully the Iranian air defences also failed miserably.
Knowing that the likelihood of rolling successful CV scores was poor, the Iranian commander allowed his units to use their initiative to open fire on the Iraqis who had stumbled within range.
On the left the assaulting Iraqi infantry escaped practically unscathed with just a single infantry unit taking sufficient damage to be KO'd. Somewhat surprisingly, the Iranian command on the left (needing CV3 to command units: -1 for night fighting, -1 for mixed formation, -1 for using opportunity fire and -1 for firing on initiative) squeezed another successful command roll out of the blue with a double 1! The M60A1 opened up again suppressing the T55 to his front, whilst his supporting 82mm Mortar managed to suppress one of the BTRs.
The Iranian CO, having cannily placed his artillery in an anti-tank role atop the hill added that weight of firepower scoring a KO on the suppressed T55. The defence of the plains was turning into a turkey-shoot!
On the right, the supporting M60A1 opened up on the flank of the Iraqi COs' command knocking out the lead BMP-1 with ease. The infantry in both bunkers withdrew towards the town escaping the effects of the chemical assault.
Iraqi Breakpoint 3/25, Iranian Breakpoint 1/12
Turns 3-6
The next four turns saw the Iraqi assault become a tad farcical. Failed command rolls, air support that fell feebly short of expectations and artillery support that was non-existant, were only appeased by the roaring success of the supporting infantry on the left who cleared the trenches with commensurate ease – only to be repelled by a fierce volume of fire from the town (and the timely arrival of the Iranian reserves – deploying in and around the town).
The Iraqi CO on the right fared no better. Repeated assaults against the Iranian trenches were repelled – fortunately only with light casualties. Thankfully the emplaced enemy M60A1 was unable to contribute to the struggle being unable to bring its gun to bear. Even the COs' attempt to draw on his reserve failed repeatedly, whilst the delayed flank attack made slow progress towards the battle.
Iraqi casualties continued to mount all across the front.
Iraqi Breakpoint 8/25, Iranian Breakpoint 3/12
Turns 7-9
With his air support exhausted, the Iraqi CO finally managed to secure the support of his reserves. Even the flank assault had now reached an area capable of supporting the attack on the left. Despite the enormous advantage of numbers, the Iranian defenders stubbornly refused to give ground assisted by the narrowness of the gap through which the Iraqis were trying to squeeze! The position, a narrow hill, flanked to its left by a marked minefield and to its right by the earlier Chemical attack, was proving a tough nut to crack. The Iraqis were restricted to fighting on a two stand frontage with no possibility of a flanking manoeuvre.
On the right the Iranian defences continued to frustrate the Iraqi attack. Stripped of his infantry support and a command blunder rendering what remained of the Infantry command useless, repeated failed command rolls continued to play a part in a general withdrawal. Even the combined fire of several tanks (25 attack dice at one point!) failed to KO the M60A1.Iranian casualties continued to mount, but time was running out for the Iraqis.
Iraqi Breakpoint 13/25, Iranian Breakpoint 8/12
Turn 10
Finally an Iraqi breakthrough came and with it a series of consecutive successful initiative rolls. The Iranian right crumbled and two infantry commands supported by the whole Iraqi reserve pool, steamed through the gap closing in on the objective. Sheer numbers overwhelmed the Iranian COs' command creating chaos.
Even the Iraqi armour joined in, once again streaming forward to increase the pressure on the Iranian defenders. With the tide turning it became the Iranian COs' turn to see command rolls fail.
Iraqi Breakpoint 13/25, Iranian Breakpoint 12/12
Turn 11
As the battle reached its final turn the Iranian defenders failed their COs' command roll and broke.
Iraqi Breakpoint 13/25, Iranian Breakpoint 13/12
Conclusion and Summary
The one thing I have always found enjoyable about BKC has thankfully continued under CWC. Yes it’s bloody frustrating when command rolls keep failing, but like an end to end football match, each player usually finds they have a ‘period of the game’ where they are dominant.
The new ‘combat/assault’ rules feel far more comfortable than before – but what I really like about CWC (which isn’t a major part of BKC) are the special rules. Far more thought has gone into how different armies operate, and whilst they may not necessarily be to everyone’s liking, I think they make individual armies more fun to play without compromising game play. Each army also includes disparate troop types – militia, regulars, elites etc, but even further distinction is made by differences in stats and also in troop capabilities.
The new rules fit seamlessly into the game and whilst I found that on the one or two occasions where situations arose that I felt I needed to check out using the rule-book, finding the correct solution was a quick process which didn’t interrupt the game thanks to the concise nature in which the rules are written - Thanks Pete!